

Directions
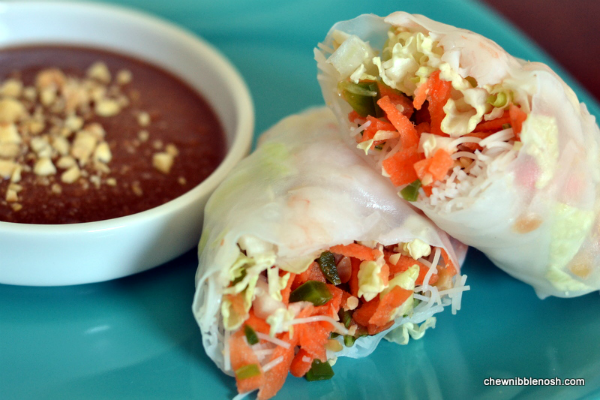 Summer rolls are one of my favorite things to order whenever we head out for Vietnamese food. They are crisp, and light, and unlike a deep-fried egg roll, don’t leave me feeling guilty after dinner. They’re kind of fun, too…crisp salad, sometimes shrimp, sometimes pork, sometimes both, all wrapped up in chewy rice paper and then dipped in peanut sauce? Good stuff.
I decided to make some of these for a friend of mine after she brought home her new sweet, baby girl. I knew that my friend liked them, because we’d dined on them many times together, and figured they would be fun, and a little bit different. (Between you and me, I was pretty nervous that I’d somehow screw them up or that the recipe I’d chosen wouldn’t be up to snuff. Thankfully, all went smoothly and they ended up being pretty tasty!)
They do take some time to put together, though. They are not something to throw together on a busy night. There’s a good deal of prep work. However, once you have them together, they keep well in the fridge for a day or so, if you keep them covered with a damp paper towel.
So, here we go.
First things first, I put together the sauce. This sauce was AMAZING. I’d make it again to serve with chicken satay or maybe even kebabs If you’re a fan of peanut sauces in general, be sure to check this out.
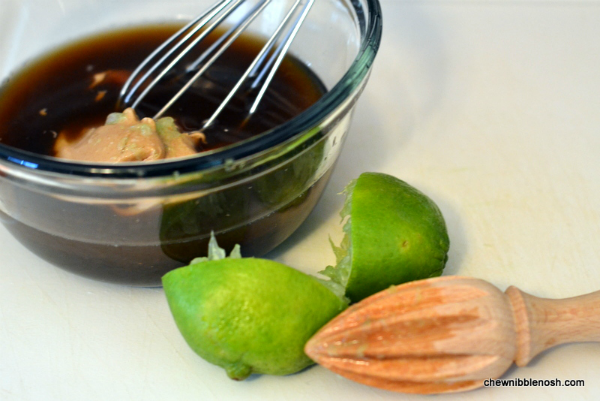
It’s simply creamy peanut butter, soy sauce, hoisin sauce, lime juice and water, but boy…was it good.
The sauce went into the fridge to hang out, and I got all of my other bits and pieces together.
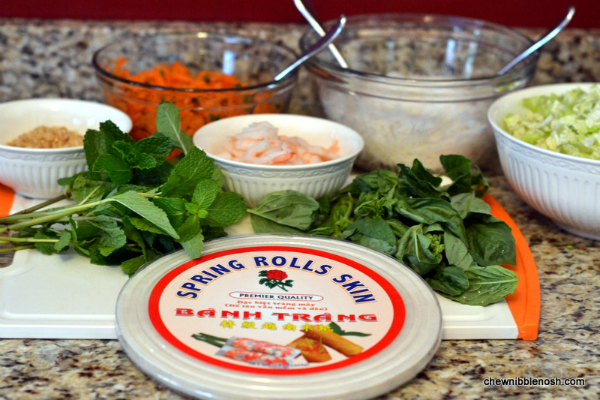
I know. It looks like a lot, doesn’t it? None of it is difficult. I promise. It’s just that a lot more goes into those little restaurant rolls than I imagined!
OK, now I was ready to put my rolls together. The spring roll skins need to be softened in water. This is simple enough. I kept a round cake pan next to me with some warm water. I’d dip a spring roll skin in the water and let it sit for just a few seconds, and before I knew it, they were soft and pliable.
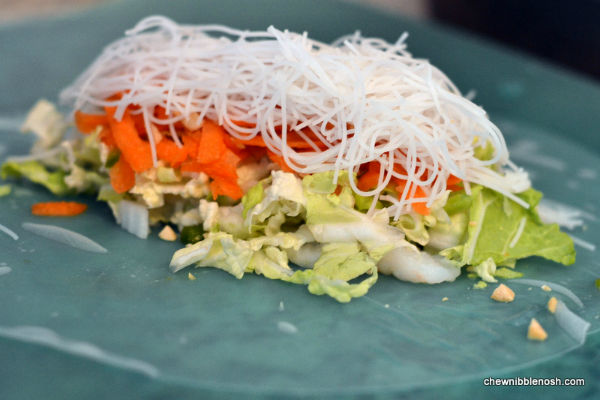
I laid the skin down on my cutting board and then built my Summer Roll. First, I put down a few pieces of shrimp, because that’s what I wanted to see on top. Then, I topped the shrimp with some shredded Napa cabbage. Next, came a mixture of shredded carrots, jalapeno peppers, sugar and lime juice. Finely chopped peanuts came next, followed by some fresh mint and basil leaves, and then all of that was finally topped off with a couple of tablespoons of cooked rice stick noodles.
Now came the scary part: The Roll Up.
Thankfully, it wasn’t that difficult. I learned that those little skins are tougher than they look, and it pays to roll them as tightly as possible.
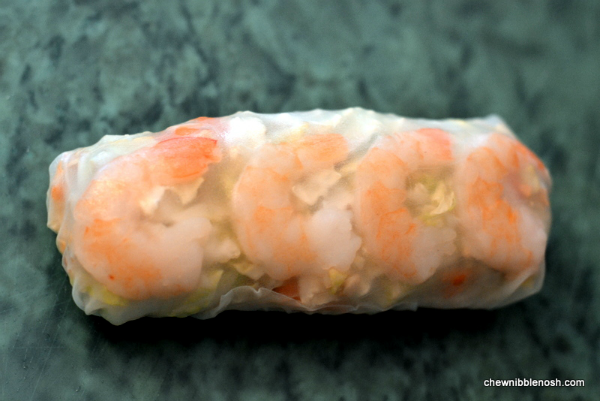
Ta-da!
So, once I had it down, I rolled up enough Summer Rolls to feed an army (or at least, two hungry families), and then I got to deliver some to my friend and her newly expanded family. I also brought along a sweet and spicy cucumber salad that I’ll share with you later this week.
We enjoyed them for dinner that night, as well, and they were delicious and completely worth all of the effort. They were so fresh, and light. Plus, like I said, that peanut sauce is to die for! They’d make great party food, because you can make them up ahead of time and just chill them until you’re ready to serve them up.
Mission accomplished!
SUMMER ROLLS WITH PEANUT DIPPING SAUCE
Adapted from Gourmet
- For the Sauce:
- 2/3 cup hoisin sauce
- 1/3 cup creamy peanut butter
- 1/3 cup water
- 3 tablespoons fresh lime juice
- 1 1/2 Tbsp. soy sauce
- For the Rolls:
- 3 ounces dried rice-stick noodles
- 2 tablespoons fresh lime juice, divided
- 1 1/2 tsp. sugar
- 2 3/4 cups coarsely grated carrot (Use large holes on a box grater)
- 3 Tbsp. finely chopped Serrano or jalapeño chiles, including seeds
- 1/2 lb. peeled and cleaned, cooked shrimp, sliced in half lengthwise.
- 12 (8-inch) rice-paper rounds, plus more in case some tear
- 4 cups thinly sliced Napa cabbage, coarsely chopped
- 1 cup finely chopped cocktail peanuts
- 1 cup fresh mint leaves
- 1 cup fresh basil leaves (Thai or Italian)
- Whisk together sauce ingredients in a bowl until smooth. Chill until ready to serve.
- Put the rice noodles in a heat-proof bowl and cover them with boiling-hot water. Soak the noodles for 10 minutes then drain and pat dry. Toss noodles with 1 tablespoon lime juice. Cut the noodles with kitchen shears or knife in 5 or 6 places.
- Stir together the sugar and remaining 1 tablespoon lime juice in another bowl until sugar is dissolved, then toss with carrots and chopped chiles.
- Gently immerse 1 rice-paper round in a shallow pan or bowl of hot tap water and let stand until soft and pliable, 15 to 20 seconds. Lift out, letting the excess water drip off, then lay the round on a work surface, smoothing it out. If round is still very wet, gently blot the top with kitchen towel.
- Lay three or four shrimp halves across the center of the round, leaving about 1 1/2 inches uncovered on both sides.
- Arrange about 1/4 cup cabbage over the shrimp. Top the cabbage evenly with 3 tablespoons of the carrot mixture, then sprinkle with 1 generous tablespoon chopped peanuts. Cover the mound of vegetables with a layer each of mint and basil leaves. Top evenly with about 2 tablespoons of the rice noodles.
- Fold edge of wrapper nearest you over the filling, tucking in filling as tightly as possible, until it touches other side of wrapper, then fold in the sides and continue to tightly roll until sealed.
- Put roll on a rimmed baking sheet lined with a damp towel and cover with another damp towel. Make 11 more rolls in same manner, storing them on baking sheet without touching.
- *The original recipe says they can be made six hours ahead of when you’re planning to serve them, but I ate leftovers the next day, and they were still really good!
- ENJOY!