

Directions
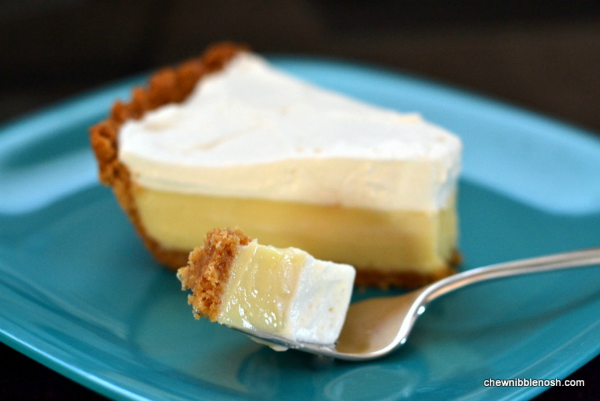
If you like Key Lime Pie, you need to try this. I am a huge Key Lime Pie fan in the summertime. I find that it’s just the perfect dessert when the weather is balmy. It’s tart, cool, and creamy, but still feels light and summery. I love it. This lemon pie, however, may have knocked Key Lime pie out of the running this summer for favorite dessert.
It’s very similar to a KL pie in preparation, and some may argue, in taste, but the lemon flavor is just a little more subtle than the lime. It’s not quite as tart, and therefore, the pie is just that much smoother, cooler and a little more comforting. Because the punch from the tart isn’t as intense, you can really appreciate the buttery crust and the cool, whipped cream. It just works together so well.
Seriously, just try it.
I started by making a simple graham cracker crust. I ground up some graham crackers in my food processor, and then added some melted butter and sugar. They went for a whirl in the Cuisinart, and then I pressed the mixture into a 9-inch pie plate.
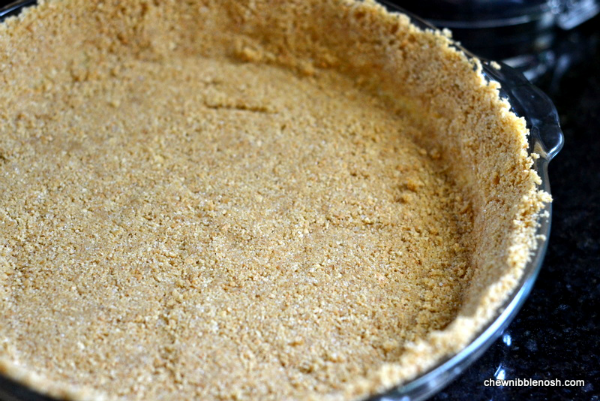
The crust baked on its own for about fifteen minutes, just long enough for it to meld all of the ingredients together to create the perfect vessel for the yummy lemon filling.
The crust needed to cool a bit, so while it was cooling, I whipped together my filling. To start, I needed to juice some lemons. Do yourself a favor and use real, honest to goodness lemons. I know that it’s easier to just grab that little plastic squeezy lemon thing at the grocery store, but when you’re making a pie like this, where lemon is the star, you really should use the real thing.

Four large lemons gave me a little more than 3/4 cup of juice…which, thankfully, was exactly how much I needed.
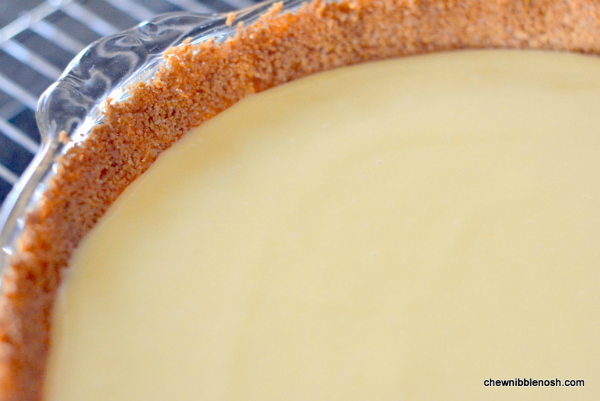
I mixed the lemon juice with some egg yolks and a couple of cans of sweetened condensed milk, poured the creamy mixture into my pie crust, and baked it for about ten more minutes. This gave the filling just enough time to set up beautifully.
I let it cool on a wire rack for an hour, and then moved the pie to the fridge to chill. It needs to chill for at least three hours, but you can make it the day before you need to serve it and just chill it longer, as well.
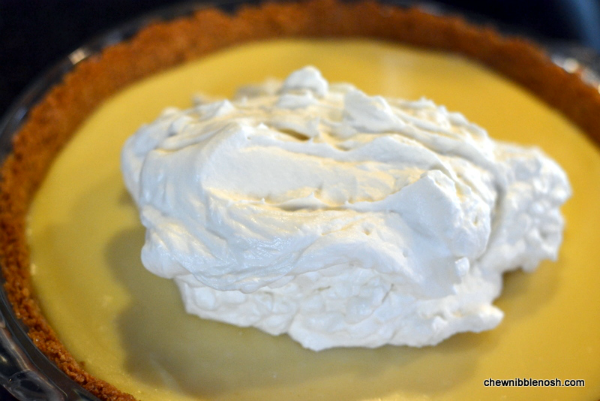
When I was ready to serve the pie, I made the whipped cream topping. I beat together some heavy whipping cream, pure vanilla extract and just a little bit of the sweetened condensed milk that I’d set aside. Once it was stiff, I spread it over the top of my pie.
When I served the pie up to my family, everything went silent, except for an occasional “Mmmmm.” Everyone was too enamored with their slice to chat about it! We all agreed, after we’d finished and could talk again, that it was a delicious way to end a summer meal.
When life hands you lemons, bake up a pie!
LEMON ICEBOX PIE
Adapted from Cook’s Country Magazine
- 9 whole graham crackers, broken into 1-inch pieces (I used Keebler brand.)
- 3 Tbsp. sugar
- 5 Tbsp. butter, melted
- 2 (14 oz.) cans sweetened condensed milk
- 3 large egg yolks
- 3/4 cup plus 2 Tbsp. fresh lemon juice (4-5 lemons…buy 6 to be safe!)
- 1 cup heavy whipping cream
- 1/2 tsp. pure vanilla extract
- Preheat the oven to 325*F and move the oven rack to the middle position in your oven.
- Place the graham crackers and sugar in the bowl of a food processor and process until finely ground, about 30 seconds. (If you don’t have a food processor, place the crackers and sugar in a large plastic zip top bag, seal it, and roll over the crackers with a heavy rolling pin. Then, pour the crumb mixture in a bowl before mixing in the butter.)
- Add the melted butter to the mixture and pulse until well combined, about 8 pulses. Transfer the crust mixture to a 9 inch pie plate. Press the crumbs in evenly, into the bottom and up the sides of the plate.
- Bake, at 325*, for about 15 minutes, until the crust begins to smell buttery and fragrant, and starts to toast up a bit. Let the crust cool completely before continuing.
- Increase the oven temperature to 375* F.
- Reserve 3 Tbsp. of the sweetened condensed milk, and keep it in the fridge to use with the topping. Pour the remaining condensed milk into a bowl and whisk it together with the egg yolks until it’s nice and smooth. Slowly whisk the lemon juice into the egg mixture, until that mixture is creamy smooth.
- Pour the filling into the baked, cooled crust. Bake the pie until the edges are set, but the center still jiggles just a bit when shaken, about 15 minutes.
- Let the pie cool for 1 hour on a wire rack. Then, refrigerate the pie until chilled and fully set, at least 3 hours and up to 24 hours.
- Using a mixer, whip the cream, reserved condensed milk, and vanilla on medium low-speed until foamy. Then, increase the speed to high and whip until stiff peaks form, between 1-3 minutes.
- Spread the whipped cream topping over the pie, slice, and serve.
- ENJOY!